The ‘C-Section Shelf’: What It Is and How To Actually Get Rid Of It
Hey mama. Let’s sit down and have a real, honest chat about something you might have noticed but maybe feel a little hesitant to ask about: the ‘C-section shelf.’ You might call it a ‘pouch,’ a ‘ledge,’ or just ‘that weird overhang’ above your incision. Whatever you call it, please know this first: you are not alone, and your body has done something truly incredible. Nearly one-third of births in the U.S. are via Cesarean section, so countless mothers are navigating this same path of healing right alongside you.
As a nurse who has supported thousands of new families, I want to demystify the C-section shelf for you. It’s not something you did ‘wrong,’ and it’s not a sign of failure. It’s a common, physiological result of major surgery—the surgery that brought your beautiful baby into the world. In this guide, we’ll walk through what’s actually going on with your body, why patience is your superpower right now, and the gentle, effective strategies you can use to heal, strengthen, and feel more at home in your postpartum body. Let’s do this together, with kindness and compassion every step of the way.
What Exactly *Is* the C-Section Shelf? (And Why Does It Happen?)
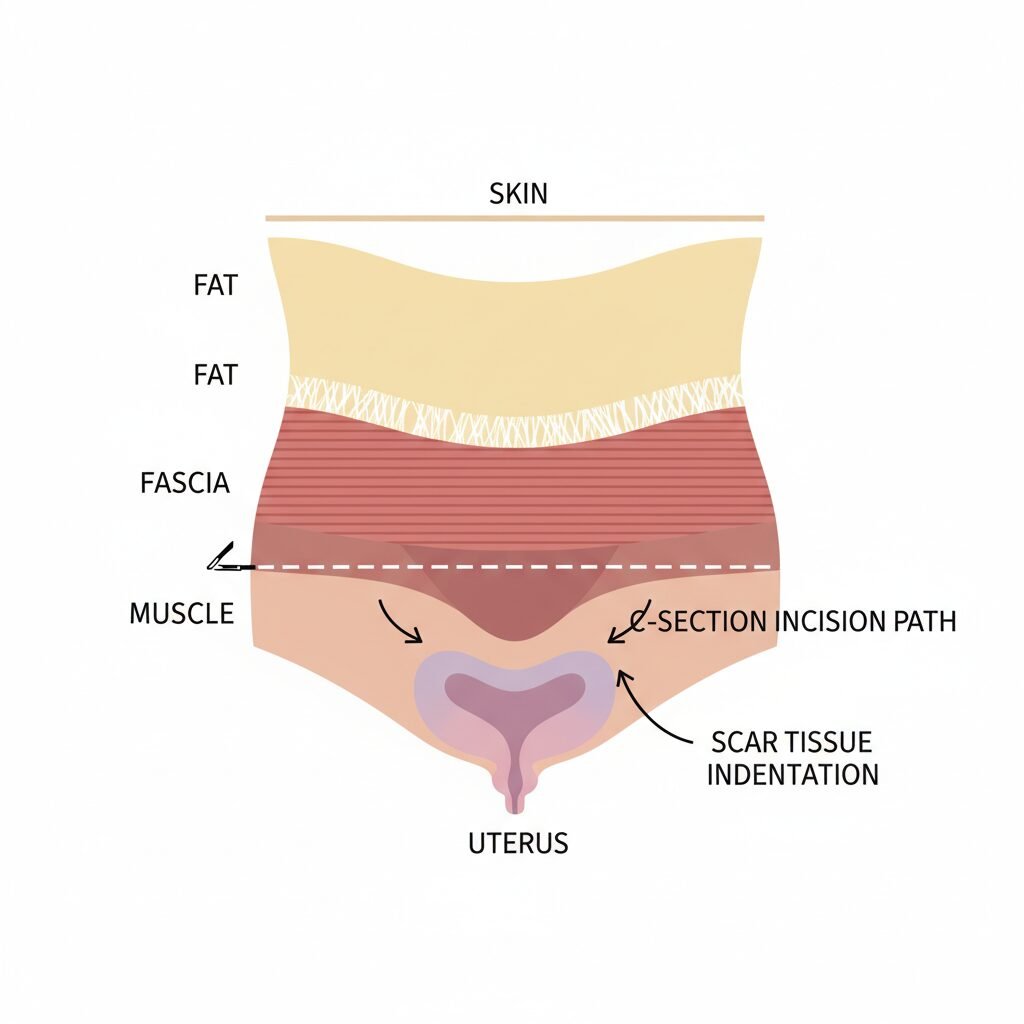
So, what’s the deal with this shelf? To understand it, it helps to visualize what happens during a C-section. It’s not just one simple cut. Your doctor carefully makes an incision through multiple layers to safely deliver your baby:
- Skin
- Fat
- Fascia (a strong layer of connective tissue)
- Abdominal Muscles (they are usually separated, not cut)
- Peritoneum (the lining of the abdominal cavity)
- Uterus
When you heal, all these layers are stitched back together. The ‘shelf’ effect is typically caused by a combination of factors:
1. Scar Tissue: The incision line creates scar tissue. This tissue can be tighter and less flexible than the surrounding skin. Sometimes, it adheres or ‘sticks’ to the deeper layers of tissue, like the fascia. This creates a tethering effect, pulling the skin inward along the scar line. The softer, un-scarred tissue above it then naturally pooches out, creating the shelf-like appearance.
2. Weakened Abdominal Muscles: Pregnancy itself stretches and separates the abdominal muscles (a condition called diastasis recti). After a C-section, these core muscles are even weaker and need time and specific exercises to regain their strength and function. Without that deep core support, the abdomen can protrude more easily.
3. Postpartum Fluid and Fat Distribution: Your body holds onto extra fluid and fat during pregnancy to support your baby. It takes time for hormones to regulate and for your body to redistribute or lose this extra tissue. This soft tissue can accumulate above the tighter scar line, making the shelf more pronounced.
Think of it like this: Imagine a soft quilt. If you sew a tight, straight line of stitching across the middle, the fluffy batting on either side will puff up around the stitch. Your scar is that tight stitch, and your soft postpartum belly is the quilt. It’s a normal part of the healing landscape!
The Foundation: Patience, Healing, and Proper Posture

Before we even whisper the word ‘exercise,’ we need to talk about the most critical first step: healing. You have just undergone major abdominal surgery. Your body needs time, rest, and grace. The first 6-8 weeks are purely about recovery and bonding with your baby.
A Gentle But Firm Reminder: Your absolute first priority is healing. Please wait for your doctor or midwife’s official clearance (usually at your 6-week postpartum checkup) before beginning any formal exercise program. Starting too soon can lead to injury and set your recovery back.
The Unsung Hero: Good Posture
While you’re healing, there is something you can work on that makes a huge difference: your posture! Think about how you hold your body all day long. Are you hunched over while feeding the baby? Slumped on the couch from exhaustion? It’s completely understandable, but this ‘mom slump’ can put extra pressure on your pelvic floor and make the shelf appear more prominent.
Here are some gentle posture cues to practice throughout the day:
- Stack Your Body: Imagine a string pulling the crown of your head up to the ceiling. Try to align your ears over your shoulders, your shoulders over your hips, and your hips over your ankles.
- Engage Your Glutes: When you stand, give your bottom a gentle squeeze. This helps to tilt your pelvis into a more neutral position and takes pressure off your lower back.
- Breathe Deeply: Practice diaphragmatic breathing (belly breathing). As you inhale, let your belly expand. As you exhale, imagine gently ‘zipping up’ your lower abs, drawing your belly button towards your spine. This is the first step in reconnecting with your deep core muscles.
Focusing on posture is a safe, passive way to begin supporting your core while your incision heals. It lays the groundwork for more active recovery later on.
Rebuilding Your Core From the Inside Out (It’s Not About Crunches!)
Once you have your doctor’s clearance, you can begin to focus on rebuilding your core strength. But please, step away from the crunches and sit-ups! These traditional ab exercises can actually make things worse, especially if you have diastasis recti, by putting too much pressure on the front of your abdominal wall.
The key is to start from the inside out, focusing on the deep core muscles like the transverse abdominis (TVA) and the pelvic floor. These muscles act like a natural corset, supporting your organs and stabilizing your trunk.
First, Check for Diastasis Recti
Diastasis recti is the separation of the rectus abdominis muscles (‘six-pack’ muscles). It’s very common. Here’s a simple way to check:
- Lie on your back with your knees bent and feet flat on the floor.
- Place one hand on your abdomen, with your fingers pointing towards your toes, right over your belly button.
- Gently press your fingertips down and lift your head and shoulders slightly off the floor, as if you’re about to do a crunch.
- Feel for a gap between the muscle walls. The width of the gap is often measured in finger-widths. A gap of more than two finger-widths is typically considered diastasis recti.
Foundational Core Rebuilding Exercises
These exercises are designed to be gentle yet effective at reactivating your deep core system.
| Exercise | How to Perform | Focus |
|---|---|---|
| Diaphragmatic Breathing | Lie on your back. Inhale deeply, allowing your belly to rise and your rib cage to expand. Exhale slowly and fully, feeling your belly gently draw in towards your spine. | Connecting breath to core activation. |
| Pelvic Tilts | Lie on your back with knees bent. On an exhale, gently flatten your lower back against the floor by tilting your pelvis upwards. Inhale to return to a neutral spine. | Activating the lower abdominals. |
| Heel Slides | Lie on your back with knees bent. Exhale and slowly slide one heel away from you until the leg is straight, keeping your pelvis stable. Inhale as you slide it back in. | Core stability and control. |
| Glute Bridges | Lie on your back with knees bent. Exhale, squeeze your glutes, and lift your hips off the floor until your body forms a straight line from shoulders to knees. Inhale as you slowly lower. | Strengthening the glutes and posterior chain to support the core. |
For the best results and a program tailored to you, I strongly recommend seeking out a pelvic floor physical therapist. They are experts in postpartum recovery and can give you a personalized assessment and exercise plan. It’s one of the best investments you can make in your long-term health!
The Power of Touch: Scar Tissue Massage

This is a step many women miss, but it can be a game-changer for the appearance of the C-section shelf. Scar massage, once your incision is fully healed, can help break down adhesions, improve blood flow, and increase the pliability of the tissue. This can reduce that ‘tethering’ effect that contributes to the shelf.
Safety First: Do NOT massage your scar until it is completely closed, with no scabs, and you have been cleared by your doctor (usually around 6 weeks postpartum). If you experience any pain, redness, or opening of the scar, stop immediately and consult your provider.
How to Perform Scar Massage
You can start very gently. Use a bit of unscented lotion or oil (like coconut oil or vitamin E oil) to reduce friction. Find a comfortable position, lying down, and take a few deep breaths to relax.
- Skin Stretching: Place your fingers about an inch above the scar. Gently stretch the skin by moving your fingers up and down, then side to side, then in small circles. You’re moving the skin over the underlying layers.
- Direct Massage: Once you’re comfortable, you can work directly on the scar. Use one or two fingers to make small circles along the length of the scar.
- Cross Friction: Place your fingers directly on the scar and move them back and forth perpendicular to the incision line. You’re not just rubbing the skin; you’re trying to move the scar tissue itself.
Aim for about 5-10 minutes each day. It shouldn’t be painful, though you might feel some pulling or tenderness. This is a wonderful way to reconnect with your body and honor the place where your baby entered the world.
Nourishing Your Body for Healing and Strength

What you eat plays a huge role in your recovery. This isn’t about a restrictive ‘bounce back’ diet—far from it. It’s about giving your body the building blocks it needs to repair tissues, manage inflammation, and support your energy levels (which, let’s be honest, you desperately need!).
Focus on Healing Nutrients:
- Protein: Essential for tissue repair and muscle building. Aim for sources like lean chicken, fish, eggs, tofu, beans, and lentils with every meal.
- Healthy Fats: Omega-3 fatty acids, found in salmon, walnuts, and flaxseeds, are powerful anti-inflammatories that can help calm the inflammation associated with surgery and healing.
- Vitamin C: Crucial for building collagen, the protein that makes up skin and connective tissue. Load up on bell peppers, citrus fruits, broccoli, and berries.
- Zinc: This mineral is another key player in wound healing. Find it in lean meats, nuts, seeds, and whole grains.
- Fiber: Constipation is common postpartum and can put uncomfortable pressure on your healing abdomen. Keep things moving with high-fiber foods like oats, apples, pears, and leafy greens.
Hydration is Non-Negotiable
Water is your best friend. It helps transport nutrients to your cells, flushes out waste products, and can even help reduce fluid retention. If you’re breastfeeding, your needs are even higher. Keep a large water bottle with you at all times and sip throughout the day. Your skin elasticity and overall healing will thank you for it!
Conclusion
Mama, navigating your postpartum body is a journey, not a race. The C-section shelf is a part of your story, but it doesn’t have to be a source of distress. By embracing a strategy of patience, gentle and consistent core work, nourishing foods, and scar care, you can absolutely heal and feel strong. Remember to be kind to yourself. Your body grew, birthed, and is now nourishing a human being. It’s a powerhouse. Your scar isn’t a flaw; it’s a beautiful, powerful mark of motherhood. Celebrate how far you’ve come, and give yourself the grace to heal, one deep, belly-filling breath at a time.