
Easiest Baby Wearing Method: How To Master The Ring Sling In Minutes
Hey there, new parent. Take a deep breath. You’re doing an amazing job. I know these early days can feel like a whirlwind of feeding, changing, and trying to find a spare second for yourself. Maybe you’re reading this with one hand while a tiny human is sleeping on your chest. If so, you’re in exactly the right place.
For decades, as a pediatric nurse and lactation consultant, I’ve seen parents search for that one magical tool to make life just a little bit easier. They want to soothe their baby, keep them close, and maybe, just maybe, make a sandwich or answer an email. That magic, my friend, is often found in babywearing. And the simplest, quickest, and most elegant entry into the world of babywearing is the ring sling.
Forget complicated wraps with yards of fabric or bulky carriers with a dozen buckles. The ring sling is intuitive, beautiful, and perfect for the newborn stage and beyond. It allows for quick ‘ups’ and ‘downs’ without waking a sleeping baby and fosters an incredible bond. In this guide, we’re going to walk through everything you need to know to master the ring sling in minutes. Ready to get your hands back? Let’s do this together.
Why the Ring Sling is a New Parent’s Best Friend
Before we dive into the ‘how-to,’ let’s talk about the ‘why.’ Why choose a ring sling when there are so many carriers on the market? Think of the ring sling as your go-to, everyday parenting superpower. It’s not just about carrying your baby; it’s about making your life flow more smoothly.
The Ultimate ‘In-and-Out’ Carrier
Newborns have their own schedule, which often involves wanting to be held one minute and needing a diaper change the next. A ring sling shines here. Once you’ve got the hang of it, you can pop your baby in and out in under 30 seconds. This is a game-changer for quick errands, trips from the house to the car, or simply moving around your home.
Promotes Bonding and Development
Keeping your baby close isn’t just convenient; it’s crucial for their development. When worn, your baby is snuggled against your chest, where they can hear your heartbeat, feel your warmth, and smell your familiar scent. This sensory comfort regulates their temperature, heart rate, and breathing. It’s like a wearable hug that recreates the security of the womb, reducing crying and fussiness. This closeness also boosts your oxytocin (the ‘love hormone’), deepening your bond and even supporting your milk supply if you’re breastfeeding.
A Secret Weapon Against Colic and Reflux
The gentle, upright position of a baby in a ring sling is fantastic for their tiny digestive systems. Gravity helps keep milk down, providing natural relief for babies struggling with reflux. The slight pressure on their tummy and the rhythmic motion of you walking can also be incredibly soothing for colicky or gassy infants. For many parents, a walk around the living room in the sling is the only thing that calms a fussy baby in the evening.
Hands-Free Freedom and Discreet Nursing
This is the big one! With your baby securely and comfortably attached to you, you suddenly have two free hands. You can fold laundry, prepare a meal, work on your computer, or hold hands with your partner. It’s about integrating your baby into your life, not putting your life on hold for your baby. Furthermore, a ring sling can act as a discreet nursing cover. With a little practice, you can easily latch your baby and use the tail of the fabric for privacy, allowing you to feed on the go without missing a beat.
Compact and Stylish
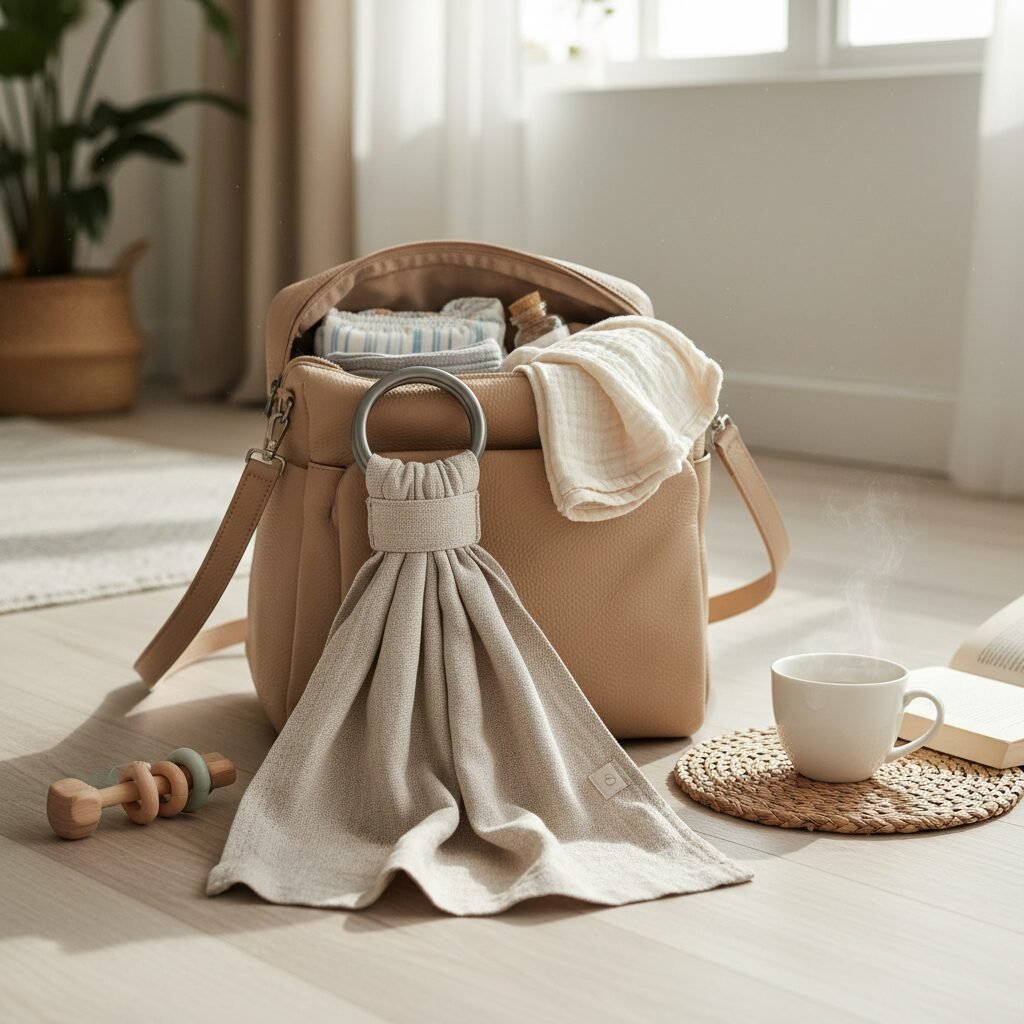
Let’s be honest, baby gear can take over your house. Ring slings are the opposite of bulky. They fold up small enough to fit into a diaper bag or a large purse, so you always have it with you when you need it. Plus, they come in a stunning variety of colors and fabrics, from breathable linen for summer to soft cotton for year-round comfort. It’s a piece of baby gear that feels more like a fashion accessory.
Before You Begin: The Ring Sling Safety Checklist
Okay, before we get that beautiful baby snuggled in, we need to talk about the most important thing: safety. Babywearing is incredibly safe when done correctly, and the guidelines are very simple to remember. The easiest way to check your work is by using the T.I.C.K.S. acronym. Memorize it, write it down, and do a quick check every single time you wear your baby.
Safety First, Always. Your baby’s airway is the number one priority. A proper position ensures they are safe, secure, and breathing easily. Never, ever let fabric cover your baby’s face.
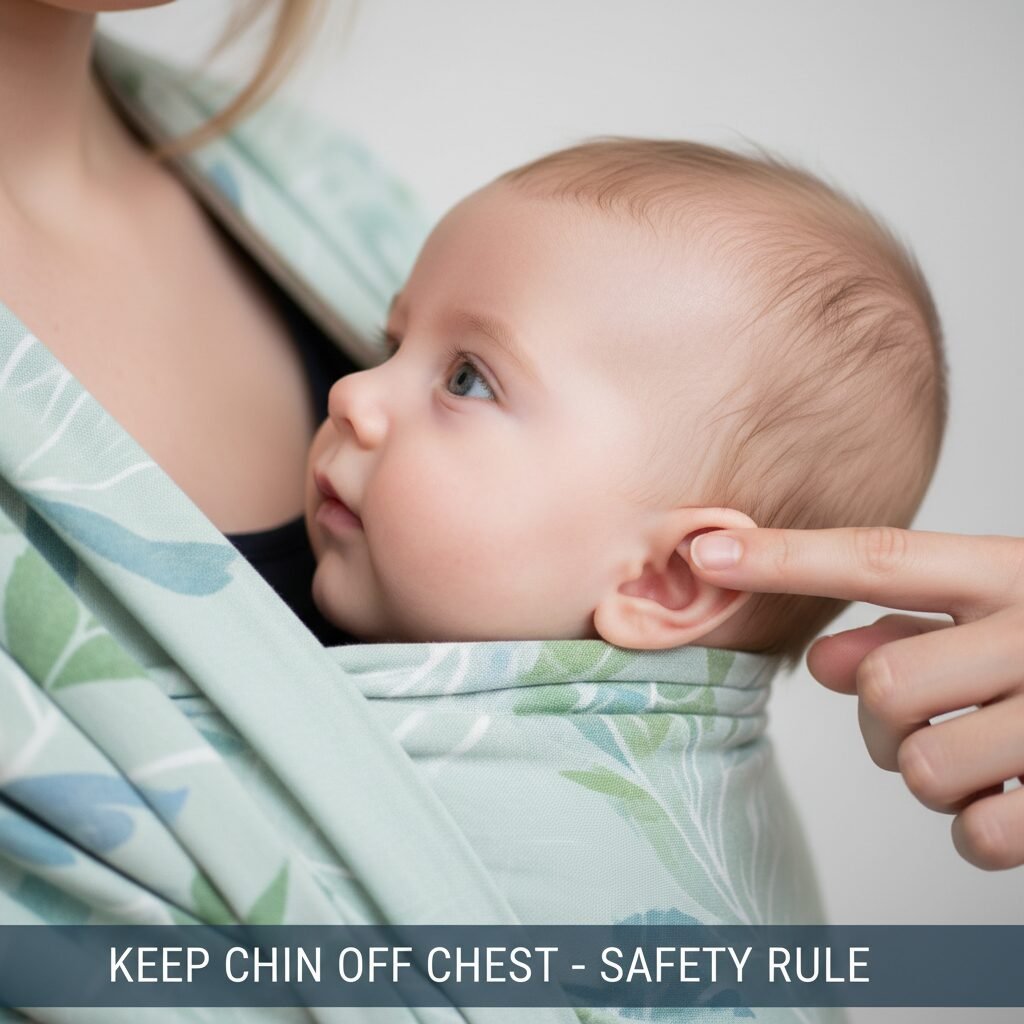
Let’s break down the T.I.C.K.S. rule. It’s your five-step safety check for happy babywearing.
| Rule | What It Means |
|---|---|
| T is for TIGHT | The sling should be tight enough to hug your baby close to you. Any slack or looseness can cause your baby to slump down, which can hinder their breathing and pull on your back. It should feel like a firm, secure hug. |
| I is for IN VIEW AT ALL TIMES | You should always be able to see your baby’s face simply by glancing down. The fabric of the sling should not close around them. You need to be able to check on them easily and often. |
| C is for CLOSE ENOUGH TO KISS | Your baby should be positioned as high on your chest as is comfortable for you. A great rule of thumb is that by tipping your head forward, you should be able to easily kiss the top of your baby’s head. |
| K is for KEEP CHIN OFF THE CHEST | This is the most critical rule. A baby’s chin tucked to their chest can restrict their airway. Ensure there is always a space of at least a finger’s width between your baby’s chin and their chest. This is especially important for newborns who have little head control. |
| S is for SUPPORTED BACK | The sling should be snug across your baby’s back to support their natural, slightly curved posture. Their tummy and chest should be against you. If the sling is too loose, they can slump, which puts their chin on their chest. |
Take a moment to really let these sink in. They will become second nature very quickly. A safe baby is a happy baby, and a confident parent makes for a calm and secure babywearing experience.
Step-by-Step: Threading Your Ring Sling Like a Pro
This might seem like the trickiest part, but I promise it’s easy once you’ve done it a couple of times. Think of it like learning to tie your shoes—a little awkward at first, and then pure muscle memory. The goal is to get the fabric threaded without any twists, so it can glide smoothly for easy adjustments.
Grab your sling and let’s do this together. Find a mirror for your first few attempts; it really helps!
- Gather the Fabric: Hold the tail end of your sling (the end without the rings). Bunch the fabric together neatly, like you’re gathering a curtain or playing an accordion. Make sure the edges (we call these ‘rails’) are straight and the fabric isn’t twisted.
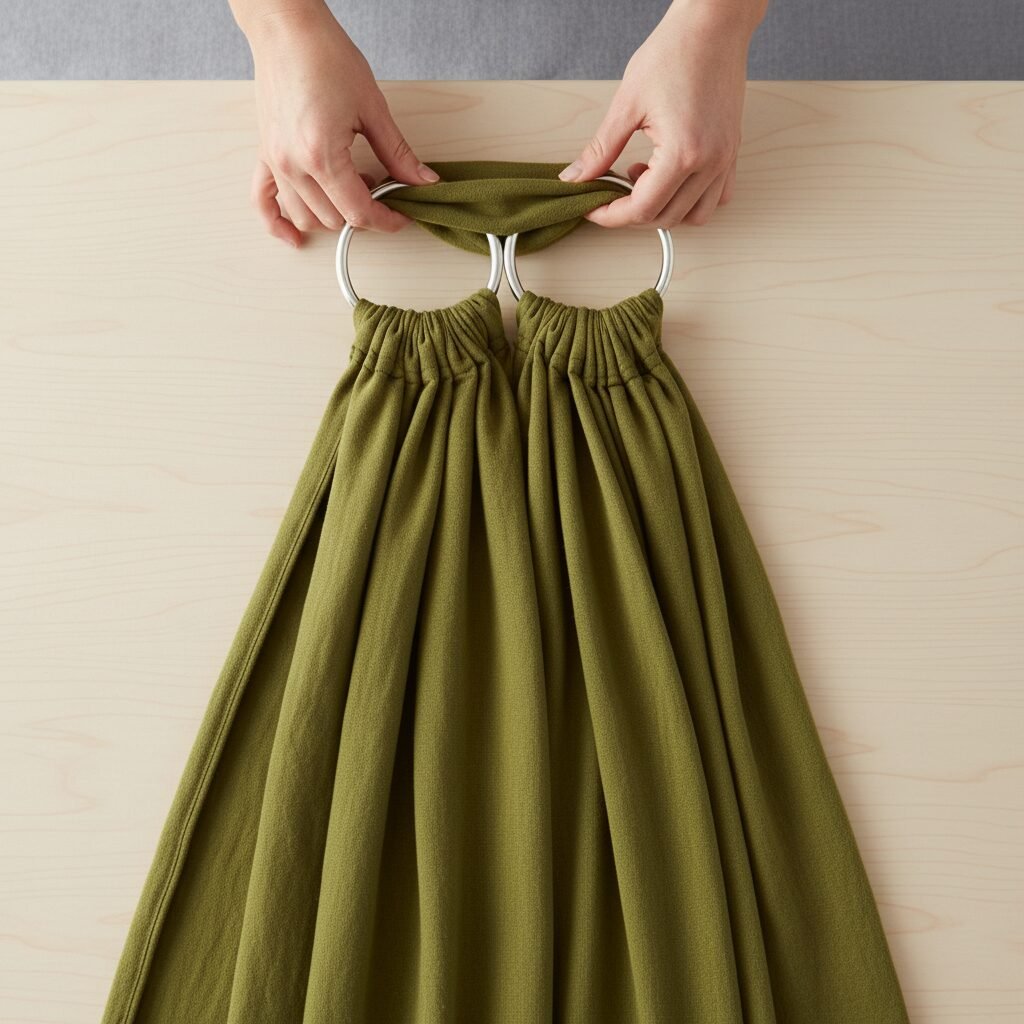
- Up Through Both Rings: Bring the gathered tail up from underneath and feed it through both rings. Pull a good amount of fabric through, about to your belly button. It should look like you’ve made one big loop.
- Separate the Rings: Now, use your fingers to separate the two rings. This is the key step! Think of the rings like a belt buckle. You’re going to ‘buckle’ the fabric in place.
- Over the Top, Under the Bottom: Take that same tail of fabric you just pulled through. Now, guide it to go over the top ring and then tuck it under the bottom ring.
- Dress the Fabric: This is the pro tip! Before you tighten it, take a moment to spread the fabric out evenly between the rings. Make sure the top rail is on top and the bottom rail is on the bottom, with no twists in between. This will allow you to adjust the sling one section at a time, which is the secret to a perfect fit.
That’s it! You’ve threaded your sling. It should now be ‘locked’ in place but still allow you to pull on the tail to tighten or lift the top ring to loosen. Leave it threaded like this and hang it on a hook so it’s always ready to go.
Your First Carry: The Tummy-to-Tummy Hold for Newborns
It’s time for the main event! The tummy-to-tummy hold is the perfect, ergonomic, and safe position for newborns and young babies. Take your time, stay relaxed, and remember your T.I.C.K.S. safety check. Always practice over a soft surface like a bed or couch for the first few tries.
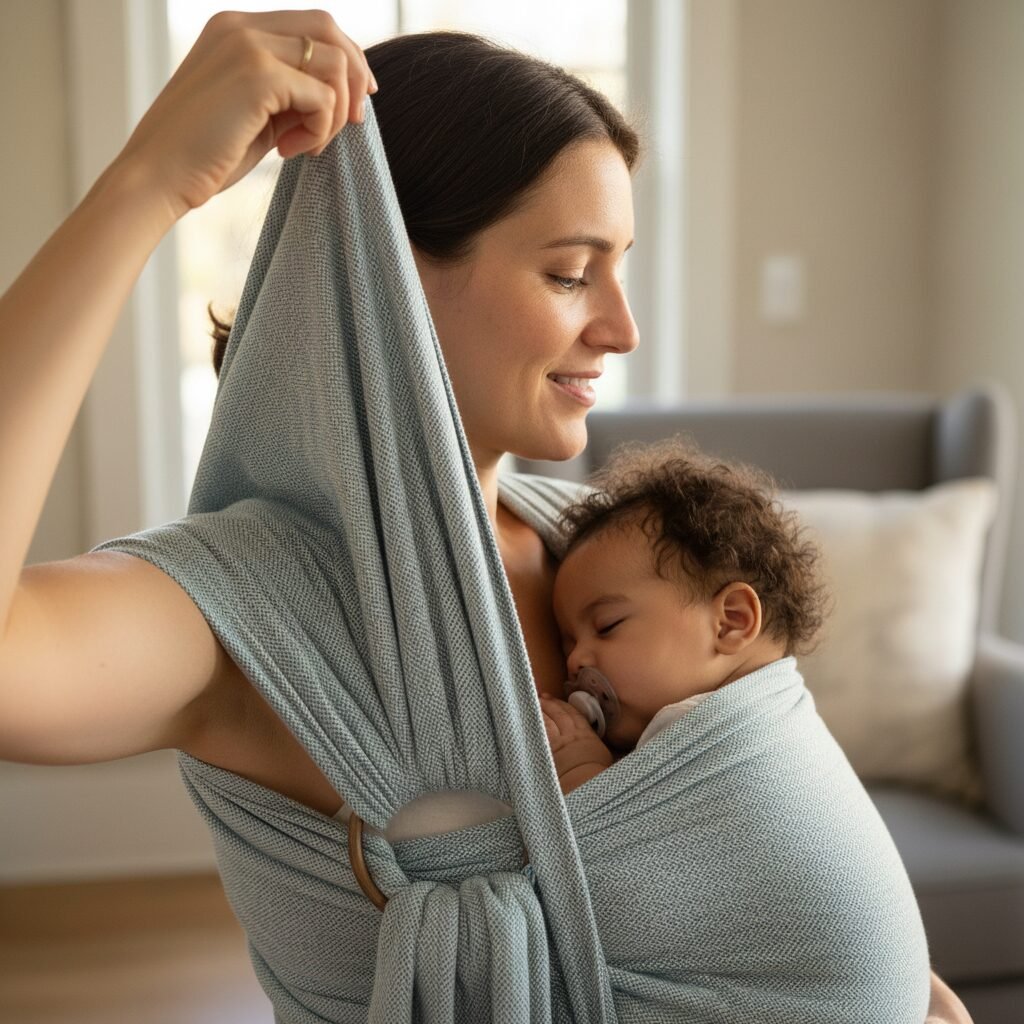
- Position the Sling: Place the sling over your head and one shoulder, like a sash. The rings should sit high up on your shoulder, almost like a corsage. Don’t let them slide down onto your chest or into your armpit. The pouch of the sling will hang in front of you.
- Create the Pouch: Adjust the size of the pouch. A good starting point is to have the bottom rail of the sling hit around your belly button. This gives you enough space to place your baby inside without it being too loose.
- Pick Up Your Baby: Hold your baby high on your opposite shoulder, the one without the rings. This is often called the ‘burp position.’ Supporting their head and bottom, you are now ready to guide them into the sling.
- Lower Baby into the Pouch: While supporting your baby’s weight with your arm, gently slide them down your chest and into the pouch of the sling. Guide their legs through first. Your other hand can open the pouch to make space.
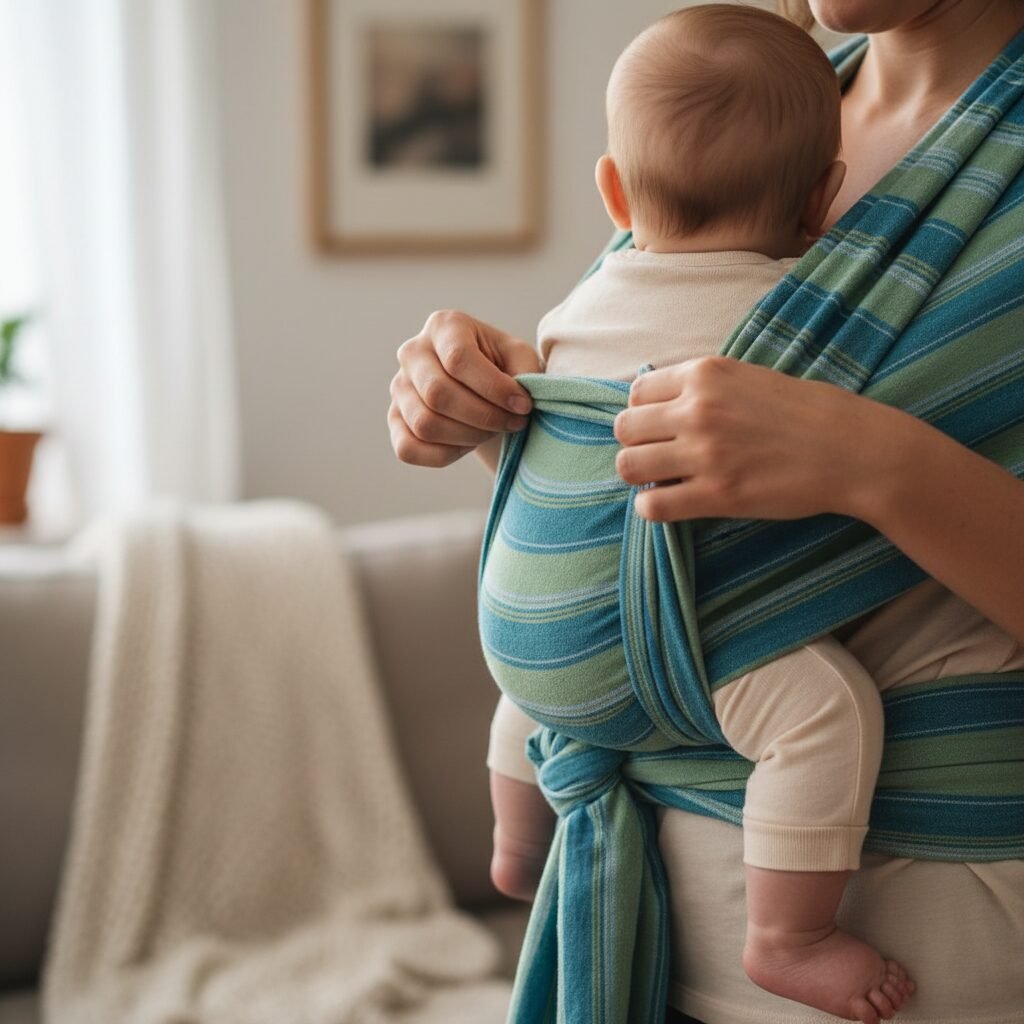
- Create the Deep Seat: This is the most important step for comfort and safety! Reach inside the sling between you and your baby and pull the bottom rail of the fabric up between their legs, so it reaches from the back of one knee to the back of the other. The fabric should be deep under their bottom, not just under their bum cheeks. Their knees should be higher than their bottom, creating an ‘M’ or ‘froggy’ shape with their legs. This position supports their hip development.
- Tighten for a Secure Fit: Now it’s time to remove the slack. Start by pulling any excess fabric from your back and bringing it forward toward the rings. To tighten, pull the tail of the sling, but don’t just yank the whole thing down. Pull strand by strand, or ‘rail by rail.’ Pulling the top edge of the tail tightens the top rail of the sling (near baby’s neck). Pulling the bottom edge of the tail tightens the bottom rail (under baby’s knees). Work your way across the fabric until the baby is held snugly and securely against your body.
- Final Checks: Run through your T.I.C.K.S. checklist. Is the sling tight? Can you see their face? Are they close enough to kiss? Is their chin off their chest? Is their back supported in its natural curve? If yes, congratulations! You did it! Go take a walk and enjoy your new freedom.
Troubleshooting Common Ring Sling Hiccups
Even the ‘easiest’ method can have a learning curve. Don’t get discouraged if it doesn’t feel perfect on the first try! Most issues are tiny adjustments away from being solved. Here are some of the most common hiccups new ring sling users face.
- The problem: The fabric is digging into my neck.
This is the most common comfort issue! It means the sling has crept up your shoulder. The solution is to spread the fabric wide over your shoulder cap, like a sleeve. This distributes the weight much more evenly across your back and shoulder, eliminating that pressure point on your neck. You can do this before you put the baby in or even after they are settled. - The problem: My baby feels too loose or is slumping down.
This means the sling isn’t tight enough. Remember the ‘T’ in T.I.C.K.S.! The most common mistake is not getting a deep enough seat. Ensure that the fabric goes from knee-to-knee. Then, go back and tighten rail by rail. The top rail should be snug enough to support their upper back and neck, preventing them from leaning away from you. The middle and bottom sections secure their torso and seat. - The problem: The rings keep slipping down onto my chest.
If your rings are migrating downwards as you tighten, it means you probably started with the pouch being too big. Before you put the baby in, try making the initial pouch a little smaller. Start with the rings positioned higher on your shoulder than you think you need them—almost behind your shoulder. As you place the baby in and tighten, they will naturally settle into the perfect ‘corsage’ position. - The problem: My back hurts after a little while.
Aching back is a sign of a less-than-optimal fit. It’s usually a combination of the issues above. Check that the fabric is spread wide across your back and over your shoulder cap. Ensure the sling is tight enough that your baby isn’t sagging, forcing you to compensate with your own posture. A snug, high carry is the most comfortable and ergonomic for both of you.
Remember, every time you wear your baby, it’s a new opportunity to practice. Small adjustments make a huge difference. You’ll be an expert in no time.
Conclusion
See? You did it! You’ve learned how to choose, safely use, and troubleshoot the ring sling. It really is one of the most rewarding and practical tools in your parenting toolkit. More than just a carrier, it’s a way to connect, to comfort, and to navigate your new life with a little more ease and a lot more snuggles.
Don’t strive for perfection on day one. Strive for connection. Every time you wrap your baby close, you are reinforcing a bond of trust and security that will last a lifetime. So take your time, give yourself grace, and enjoy all the hands-free, heartwarming moments ahead. You’ve got this, and you’re doing a fantastic job.