10 Pain-Free Breastfeeding Latch Hacks Every New Mom Needs To Know
Hello, new mama. Take a deep breath. I know you might be reading this with tears in your eyes, toes curled in pain, or a heart full of frustration. You were told breastfeeding is the most natural thing in the world, a beautiful bonding experience. And while it absolutely can be, you were probably not told that it can also come with a steep learning curve and, for many, significant pain. If every feeding session feels more like a battle than a bonding moment, please hear me: You are not alone, and it is not your fault.
As a pediatric nurse and lactation consultant, I’ve sat with hundreds of mothers just like you. I’ve seen the grimaces, the cracked nipples, and the sheer exhaustion. The good news? Pain is not a required part of the breastfeeding journey. It’s a signal from your body that something isn’t quite right with the latch. And the even better news is that with a few simple adjustments—what I like to call ‘hacks’—we can turn things around. This guide is your personal, on-demand lactation consultation. We’re going to walk through 10 practical, pain-free latch hacks that will empower you to find comfort, confidence, and connection in your feeding experience. Let’s get you and your little one comfortable and happy.
First, Let’s Understand: Why Does a Bad Latch Hurt So Much?
Before we dive into the hacks, it’s incredibly helpful to understand why you’re feeling pain. Knowledge is power, and knowing the mechanics can help you troubleshoot in the moment. Pain during breastfeeding almost always comes down to a shallow latch.
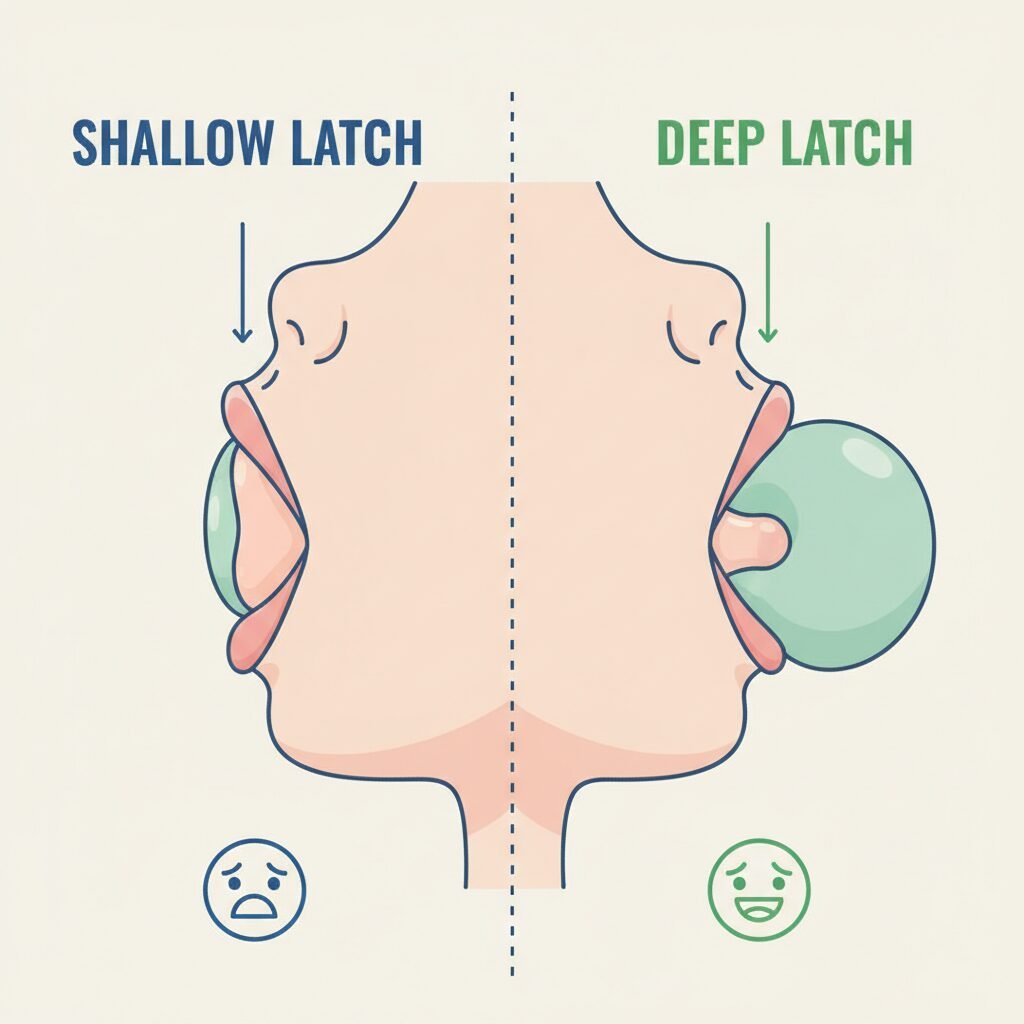
Imagine your nipple is like a short straw. If your baby only latches onto the tip, they have to use immense suction to draw milk out, and their hard palate clamps down directly on that sensitive nipple tissue. Ouch! This is a shallow latch.
A deep latch, on the other hand, is the goal. This is when your baby takes a large mouthful of breast tissue, drawing your nipple far back into their mouth where it rests against their soft palate. Their gums and tongue then work to compress the milk ducts located in the areola (the darker area around your nipple), not the nipple itself. When the latch is deep, milk flows more freely, baby is more satisfied, and you feel a comfortable tugging or pulling sensation—not sharp, pinching, or burning pain.
Common Causes of a Shallow Latch:
- Improper Positioning: If you or your baby aren’t aligned correctly, it’s physically difficult for them to open wide and get a deep mouthful.
- Not Waiting for a Wide Gape: Trying to latch a baby with a small, pursed mouth is a recipe for a painful, nipple-only latch.
- Tongue or Lip Ties (Ankyloglossia): Sometimes there’s an anatomical reason. A short frenulum (the tissue connecting the tongue to the floor of the mouth or the lip to the gum) can restrict the baby’s tongue movement, making a deep latch impossible. If you suspect this, a consultation with a pediatric provider or lactation consultant is essential.
A Gentle Reminder: A little tenderness in the first 30-60 seconds of a feed can be normal in the early days as your body adjusts, but it should fade quickly. Sharp, shooting, or persistent pain throughout the feed is a sign that you need to adjust the latch.
Setting the Stage: Your Pre-Latch Checklist for Success

Think of breastfeeding like a performance. You wouldn’t go on stage without setting up your props first, right? A successful, pain-free latch often begins before your baby even comes to the breast. Rushing can lead to poor positioning and a painful latch that sets a negative tone for the whole feed. Let’s create a calm, comfortable environment.
Create Your ‘Nursing Nest’
Find a spot in your home where you can truly relax. This could be a comfy glider, a corner of the sofa, or your bed. Surround yourself with everything you might need for the next 30-45 minutes. Your goal is to not have to move once you get settled.
- Pillows, Pillows, Pillows: Use them to support your back, your arms, and the baby. The baby should be brought up to the level of your breast, so you aren’t hunching over. A dedicated nursing pillow can be a lifesaver.
- Hydration and Snacks: Breastfeeding is thirsty work! Keep a large water bottle and some one-handed snacks (like a granola bar or nuts) within arm’s reach.
- Entertainment: Have your phone, a book, or the TV remote nearby. While gazing at your baby is wonderful, you’ll spend many hours nursing, and it’s okay to relax and entertain yourself.
Get Yourself Comfortable First
Before you even pick up your baby, settle into your nest. Get your back supported. Prop your arms up. Take a few deep, calming breaths. A relaxed mom helps create a relaxed baby. If you’re tense and hunched, your baby will feel it. Releasing tension in your shoulders and neck can make a world of difference.
The 10 Pain-Free Breastfeeding Latch Hacks

Alright, mama, you’re prepped and ready. Now for the main event! These are the game-changing techniques that can transform your breastfeeding experience from painful to pleasurable. We’ll go through them one by one.
Hack 1: The ‘Nipple Sandwich’ or ‘C-Hold’
Your breast is soft and round, but a baby’s mouth is wide and flat. To help them get a bigger mouthful, you need to shape your breast. Use your free hand to form a ‘C’ shape, with your thumb on top and fingers underneath, well behind the areola. Gently compress your breast so it’s shaped more like a sandwich. This makes it much easier for your baby to latch on deeply.
Hack 2: Perfect Alignment: Tummy-to-Tummy
One of the biggest mistakes I see is a baby lying on their back with their head turned to the side to feed. Try turning your head and swallowing—it’s awkward! Your baby feels the same. Ensure your baby is rolled completely onto their side, with their entire front—tummy, chest, and hips—pressed against yours. Their body should be in a straight line from their ear to their shoulder to their hip.
Hack 3: The Nose-to-Nipple Cue
Don’t aim your nipple for the center of your baby’s mouth. Instead, position your baby so your nipple is pointing towards their nose or is level with the space between their nose and upper lip. This encourages them to tilt their head back slightly, which naturally opens their mouth wider and helps them get more of the lower part of the breast, leading to a deeper, asymmetrical latch (more on that next!).
Hack 4: Wait for the Gape (The ‘Wide-Open Garage Door’)
This is non-negotiable for a pain-free latch. You need to wait for your baby to open their mouth really wide, like a big yawn. You can encourage this by gently tickling their top lip with your nipple. Be patient. When they open wide, that’s your signal to bring them in quickly and confidently.
Safety Tip: Always bring the baby to the breast, not the breast to the baby. Leaning over and pushing your breast into their mouth often leads to a shallow latch and back pain for you.
Hack 5: Aim for an Asymmetrical Latch
A perfect latch isn’t a perfect bullseye. When you look at your baby at the breast, you should see more of your areola above their top lip than below their bottom lip. This means their chin is pressed deeply into your breast, and their bottom lip is flared out, allowing their tongue to do the maximum work of milk extraction without pinching your nipple.
Hack 6: The Flipper Technique for Lips
After your baby has latched, check their lips. They should be flanged outward, like fish lips, not tucked in. If you see their top or bottom lip curled inward, gently use your finger to press on their chin or just under their nose to encourage the lip to flip out. This ensures a better seal and more comfort for you.
Hack 7: How to Break Suction Safely
If the latch is painful, don’t just pull your baby off! This can cause significant nipple damage. Instead, gently slide your clean pinky finger into the corner of their mouth, between their gums. This will break the suction, and you can easily remove them and try again. It’s better to relatch 10 times than to endure one painful feeding.
Hack 8: Experiment with Different Positions
There is no single ‘best’ position. The best one is whatever is comfortable for both of you. Don’t be afraid to mix it up, especially if one side is more challenging than the other. Different positions change the angle of the latch and can alleviate pressure points.
Here’s a quick comparison of the most common holds:
| Position | Best For | Key Tip |
|---|---|---|
| Cross-Cradle | Newborns and babies struggling to latch. Offers great head control. | Support your breast with the same-side hand (C-hold) and support baby’s neck with your opposite hand. |
| Football (or Clutch) Hold | Moms who had a C-section, have large breasts, or are nursing twins. | Tuck baby under your arm like a football, with their feet pointing towards your back. Support their neck with your hand. |
| Cradle Hold | The ‘classic’ position, often easier once baby has better head control. | Baby’s head rests in the crook of your elbow on the same side as the breast they are nursing from. |
| Laid-Back (Biological Nurturing) | Moms with a fast let-down or sleepy babies. Uses gravity to help. | Recline comfortably and let your baby lie on your chest, allowing them to use their natural reflexes to find the breast. |
Hack 9: Nipple Care is Self-Care
Even with a great latch, your nipples are working hard. After each feeding, express a little breast milk and let it air dry on your nipples. Breast milk has amazing antibacterial and healing properties. Using a high-quality, 100% lanolin cream can also provide a protective barrier and promote healing. If you’re experiencing cracks or bleeding, hydrogel pads can provide cooling relief.
Hack 10: Know When to Ask for Help
This is the most important hack of all. You do not have to figure this out alone. If you’ve tried these tips and are still in pain, it’s time to call in the professionals. A board-certified lactation consultant (IBCLC) can provide personalized, hands-on help. They can assess your latch, weigh your baby before and after a feed to check for milk transfer, and identify issues like a tongue tie. Your pediatrician, local hospital, or La Leche League are great resources for finding help.
Conclusion
My dear new mom, I hope these hacks feel like a lifeline. Breastfeeding is a skill that both you and your baby are learning together. It requires patience, practice, and a whole lot of grace for yourself. There will be good feeds and not-so-good feeds, and that is completely normal. Remember, the goal is not perfection; it’s a fed, happy baby and a comfortable, confident mom.
Celebrate the small victories—the one good latch in a tricky feeding session, the moment you realize the pain has subsided, the quiet minutes of connection. You are doing an incredible job. Keep these hacks in your back pocket, trust your instincts, and never, ever hesitate to reach out for help. You’ve got this.